Wednesday, December 18, 2013

Card Set

I adore this cute little box set, made as a gift. It's simple, yet elegant. Love it! 
In a "pizza" style box, with a belly band around it


some detail added to the envelopes too!


Friday, December 13, 2013

Making a Sign

In anticipation of our picture day, and knowing we needed to get our new address "out to the masses" - I turned to pinterest for cute "we've moved" pictures and/or ideas. I was really disappointed, actually. I found...pretty much nothing I could use for ideas on poses etc. I had already had a "chalkboard" idea - but couldn't really find anything cool to copy online.

So I was just going to do it myself. Buuuut...I don't have a large chalkboard. I didn't really have the motivation to make one. And once I did - my handwriting stinks. How to get it looking really cool and picture worthy?

Then I noticed a big mirror we have yet to hang here at our new house. It was the right size, so I was brainstorming how to write on glass and not have it too reflect-y and stuff.

And then one day, as I was looking online for what kind of markers to use for writing on glass, a moment of clarity. Here are a few tips for the process of how to do this.
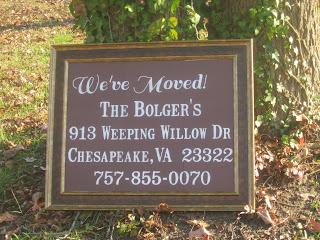
We've moved!
This is our mirror - it's large and heavy!
First step, you need a computer, and Word, or a similar program (I have the free Open Office Writer, since MS products are not free anymore) - in your blank document, change the dimensions of your page to match the area you are covering. In my program, this was Format > Page > then put in dimensions and save. Mine was somewhere around 30 x 25, I can't remember exactly.

Then you choose your fonts and keep hitting the "view page" or "print preview" button, so you can see it all in one screen shot:-) You want to make sure your font size is large enough to fill the area you are covering. Then you print out tester versions. You may need to alter your printer settings, so it prints out "poster size" - for my size of project, it printed on 9 sheets of paper. Once I lined it up and everything looked good, I printed it on my "good" paper. I thought I would do black paper, but my black ink wasn't dark enough, or maybe my paper was really really black, but I couldn't really see the lines of the font well on the black, so I went with dark brown instead. You do need to be able to trace the fonts, so you have to be able to see it well enough to do that.
Line it all up, adjust your font positioning in Word and re-print if necessary. You want to be sure it will line up properly when you print the real deal.
Once everything is printed and trimmed (use a paper cutter for accuracy here), it should all line up perfectly! I used double sized tape to stick the paper to the mirror. Then the fun part! Using a "painter" pen, trace your font! You can get these at Walmart or Michaels. Sharpie makes paint pens, and other companies too (this one was not a Sharpie brand). This pen did my whole sign, I didn't need two of them. I was impressed, I thought I might need another, but I didn't!
 
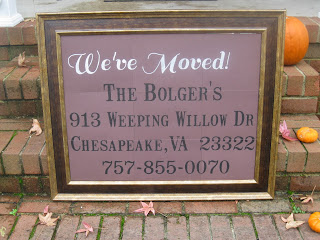
Starting to colour it in!
All done! I really like how it turned out, kind of a cute little prop for picture day...that is also informative!


Wednesday, November 13, 2013

Tile Coaster Sets


Tile Coasters

They look easy and they are! I was going to do a few collage pics of everything, so it wouldn't be so long/boring - 'cause it really is that easy! BUT...my the online picture editor I use is giving me fits and not loading - so here they are individually. Sorry.

SUPPLIES:
4x4 Tiles from hardware store
Staz On Ink
Stamps
Blender Pen & Stampin' Pastels (optional)
Clear Coat Sealer
Felt Pads

For me, since I owned everything (including the felt pads!) - all I had to buy was the tile, and the sealer, which will last for all of eternity. One trip to Home Depot and I was good to go! If you don't already own the crafting items needed, this may not be a very cost effective craft for you - might just go buy some coasters! :-)
Tiles - at HD, they come in a pack of 10 for 3.97 - they are natural stone tiles. They don't come with bananas, you have to buy those separate;-)

They do vary quite a bit, but from all the packages I bought, only 2 have been so "tumbled" looking that I can't use them. Here is one with more variety to it, but it adds character and is still useable. Sort through the tiles and select the ones that match the most in shading and style to be a set

Staz On Ink & Cleaner - I don't remember how much these cost, I've owned them for years. Likely about $5 for the ink, and $3 for the cleaner (which you really do need - can't get the ink off the stamps otherwise). I used stamps from stamp sets I already owned

Clear protecting sealer - I got a matte finish, but they sell it in gloss too if that is what you like the look of. I think matte gives the natural tiles a more natural look when finished. I bought this at HD for 3.50, and it will probably never run out, as very minimal amounts are used.

These are optional, but kind of neat - if you don't own them, you can stick with black designs, which is also pretty. If you do own these...gorgeous!!

I had a bunch of these in my cupboards, on hand for random furniture that may need it. I cut into squares to apply

The small ones like this work too! Whatever you have on hand or choose to buy

Done! This one is very tumbled, and not very smooth, but sooo cool, right?

The back

A great Christmas gift

Pretty, right?

It's sideways, but here is the set of 4

Up close. LOVE the look with the colour on there!

Lots of monograms

 
If it's not obvious, here is how to:

Wash the tiles - they come dirty and dusty. Rinse with water and let dry COMPLETELY/over night

Stamp on the tiles

Colour in your design, if you want

Seal it with the clear coat spray - let dry. Once dry, test it out with a really wet glass - design will not smudge at all!

Apply the felt tabs to the back.

Done!

Friday, November 8, 2013

Mini Album

I made a mini album for a friend - I really love the way it turned out.


Friday, May 24, 2013

As You Wish

I painted a 7x14 canvas with grey acrylic paint I had on hand. Let Dry.

I picked a font in Word, it was called "Impact" and I made it font size 230. This would fit well with my dimensions. I printed the letters onto 80lb cardstock and cut them out.

I placed them on the canvas, where I wanted them, and painted over the edges with grey paint. To help the other colour from seeping in, and to hold the letter in place so it would not move around. Hands get a little messy doing this:-)
I quickly dried the canvas in front of a fan for a few minutes, then I mixed my other colour...I used a lighter blue and a brighter turquoise to make a new shade of turquoise.

Paint over everything.

While paint is still wet, very carefully remove the letters. I used a very sharp exacto style knife to get under an edge and raise it up for removal. Be careful not to cut or poke through the canvas.
the letters, removed
Let dry.

I roughed up the canvas and paint with a piece of sandpaper (unknown grit, from garage). It was really, actually, not a very fine grit, but pretty rough. I was light with my touch so as not to remove too much paint, but just enough to scuff it up and make it worn.
Add caption

All done. Now where to place it?
I really really love it!!