Showing posts with label How To. Show all posts

Friday, December 13, 2013

Making a Sign

In anticipation of our picture day, and knowing we needed to get our new address "out to the masses" - I turned to pinterest for cute "we've moved" pictures and/or ideas. I was really disappointed, actually. I found...pretty much nothing I could use for ideas on poses etc. I had already had a "chalkboard" idea - but couldn't really find anything cool to copy online.

So I was just going to do it myself. Buuuut...I don't have a large chalkboard. I didn't really have the motivation to make one. And once I did - my handwriting stinks. How to get it looking really cool and picture worthy?

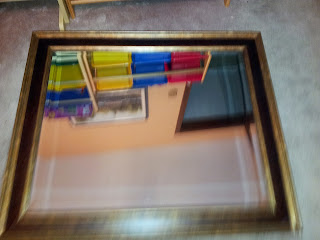
Then I noticed a big mirror we have yet to hang here at our new house. It was the right size, so I was brainstorming how to write on glass and not have it too reflect-y and stuff.

And then one day, as I was looking online for what kind of markers to use for writing on glass, a moment of clarity. Here are a few tips for the process of how to do this.

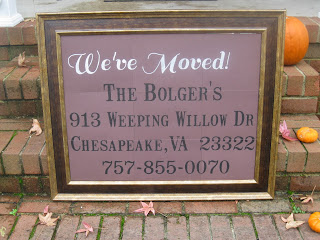
We've moved!
This is our mirror - it's large and heavy!
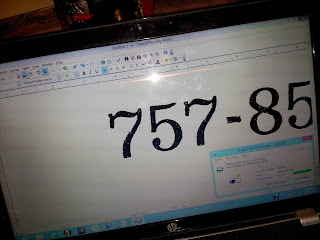
First step, you need a computer, and Word, or a similar program (I have the free Open Office Writer, since MS products are not free anymore) - in your blank document, change the dimensions of your page to match the area you are covering. In my program, this was Format > Page > then put in dimensions and save. Mine was somewhere around 30 x 25, I can't remember exactly.

Then you choose your fonts and keep hitting the "view page" or "print preview" button, so you can see it all in one screen shot:-) You want to make sure your font size is large enough to fill the area you are covering. Then you print out tester versions. You may need to alter your printer settings, so it prints out "poster size" - for my size of project, it printed on 9 sheets of paper. Once I lined it up and everything looked good, I printed it on my "good" paper. I thought I would do black paper, but my black ink wasn't dark enough, or maybe my paper was really really black, but I couldn't really see the lines of the font well on the black, so I went with dark brown instead. You do need to be able to trace the fonts, so you have to be able to see it well enough to do that.
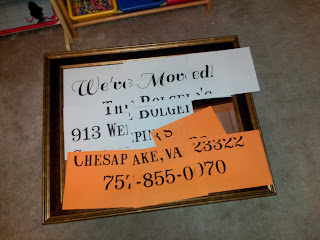
Line it all up, adjust your font positioning in Word and re-print if necessary. You want to be sure it will line up properly when you print the real deal.
Once everything is printed and trimmed (use a paper cutter for accuracy here), it should all line up perfectly! I used double sized tape to stick the paper to the mirror. Then the fun part! Using a "painter" pen, trace your font! You can get these at Walmart or Michaels. Sharpie makes paint pens, and other companies too (this one was not a Sharpie brand). This pen did my whole sign, I didn't need two of them. I was impressed, I thought I might need another, but I didn't!
 
Starting to colour it in!
All done! I really like how it turned out, kind of a cute little prop for picture day...that is also informative!


Wednesday, November 13, 2013

Tile Coasters

They look easy and they are! I was going to do a few collage pics of everything, so it wouldn't be so long/boring - 'cause it really is that easy! BUT...my the online picture editor I use is giving me fits and not loading - so here they are individually. Sorry.

SUPPLIES:
4x4 Tiles from hardware store
Staz On Ink
Stamps
Blender Pen & Stampin' Pastels (optional)
Clear Coat Sealer
Felt Pads

For me, since I owned everything (including the felt pads!) - all I had to buy was the tile, and the sealer, which will last for all of eternity. One trip to Home Depot and I was good to go! If you don't already own the crafting items needed, this may not be a very cost effective craft for you - might just go buy some coasters! :-)
Tiles - at HD, they come in a pack of 10 for 3.97 - they are natural stone tiles. They don't come with bananas, you have to buy those separate;-)

They do vary quite a bit, but from all the packages I bought, only 2 have been so "tumbled" looking that I can't use them. Here is one with more variety to it, but it adds character and is still useable. Sort through the tiles and select the ones that match the most in shading and style to be a set

Staz On Ink & Cleaner - I don't remember how much these cost, I've owned them for years. Likely about $5 for the ink, and $3 for the cleaner (which you really do need - can't get the ink off the stamps otherwise). I used stamps from stamp sets I already owned

Clear protecting sealer - I got a matte finish, but they sell it in gloss too if that is what you like the look of. I think matte gives the natural tiles a more natural look when finished. I bought this at HD for 3.50, and it will probably never run out, as very minimal amounts are used.

These are optional, but kind of neat - if you don't own them, you can stick with black designs, which is also pretty. If you do own these...gorgeous!!

I had a bunch of these in my cupboards, on hand for random furniture that may need it. I cut into squares to apply

The small ones like this work too! Whatever you have on hand or choose to buy

Done! This one is very tumbled, and not very smooth, but sooo cool, right?

The back

A great Christmas gift

Pretty, right?

It's sideways, but here is the set of 4

Up close. LOVE the look with the colour on there!

Lots of monograms

 
If it's not obvious, here is how to:

Wash the tiles - they come dirty and dusty. Rinse with water and let dry COMPLETELY/over night

Stamp on the tiles

Colour in your design, if you want

Seal it with the clear coat spray - let dry. Once dry, test it out with a really wet glass - design will not smudge at all!

Apply the felt tabs to the back.

Done!

Saturday, December 8, 2012

Easy Card!

How to make this card, so that all the images line up perfectly on the layers...
Use a normal sized card (5.5x4.25). Cut white card stock to 4.75x3.5 and 4x2.75
Line up the card stock neatly, use a small amount of adhesive if desired
Stamp over all three layers

More stamping!
Cut coloured cardstock to 4.25x3 and 5x3.75, remove the layers and adhere the coloured paper, and then place everything back together.

Add sentiment and embellish as desired. A beautiful card, and really easy to make!


Wednesday, January 11, 2012

Clear Mounts Stamps - Video

I am sold on the new clear mount stamps Stampin' Up! sells!! Not only do I find it an equal in superior quality to the wood mount stamps, but I love the money savings of going with clear mount, and the storage space situation is *amazing* too!! Check out this video to see how to mount and use the stamps. With a few of my personal ideas and tips in there too...like which clear blocks to buy. Like I mention at the end of the video...I will soon be converting my wood mount to clear I think...because of all the space it will save me.

*Please forgive the white streaks and flecks all over my hands! I've been painting:-)
**Also forgive the shadows, I can't seem to figure out a place with proper light and limited shadows.
***in the video I mention buying another block (smaller) and saying "I don't know why"...I don't know why I said that. Lol. I don't want it for ease of use, but for using multiple images and the stamp-a-ma-jig...you want more than 1 block so you don't have to reposition the stamp-a-ma-jig every single time. Brain freeze moment!

Saturday, April 30, 2011

Long Side, Short Side - Video

Check out this little explanation to help you with the "long side, short side"...it will help you save paper with fewer mistakes, I hope!

Sorry for trying to do everything with only one hand, I had to hold the camera!

Wednesday, March 16, 2011

How To: 3x3 envelope

How do you make a matching, super cute envelope to go with your card?

One thing you need to know about me - I *love* 3x3 cards. They are my faves!! They are just so cute! So to go with those sweet little cards, here's a sweet envelope!

Start with sacrificing one of your Stampin' Up 3x3 envelopes, by carefully taking it apart (To fit that size card, it measures a little bigger than 3x3, really). Keep this as your template.
Hold the template to your designer paper and cut out. No need to trace it, it's so simple! Use some Dotto removable adhesive if you want to/need to
(This is the other side of that same paper). Use a bone folder, or your scoring blade, and score lines from corner to corner on each side
Fold and adhere. Isn't it cute?!
All of Stampin' Up's Designer Paper is double sided. Which would be perfect for the hand delivered card/gift, but could be a little much to put through the mail, depending on the pattern. You can always use your non-SU designer paper to make one with a white side, and fold it white side out.
non SU designer paper envelope
The outside is white for mailing. A little more tame, but still really special and pretty when opened up!

Friday, March 11, 2011

How To: Tri-fold card

You will need punches: Large circle scallop, small circle scallop, medium oval & small oval. I used the stamp sets Polka Dot Punches and Fundamental Phrases with Basic Black ink.
The gray punch is the new punch style by Stampin' Up. It "closes" to help with storage.
You will need paper: Designer Paper 4x12 (double sided print). Basic Black 4 1/4x 4 1/4, and 3 1/2 x 3 1/4. Very Vanilla 3 x 3 1/4
Score the designer paper at 4" from each end
Use a bone folder to fold up the sides into a triangle, like this:
Adhere the flaps down with adhesive, so they can't open anymore.
Along the bottom edge, put just one strip of adhesive, to hold the triangle flap down, and to create a pocket to hold the note card
Use a wedge of a Stampin' Sponge to sponge the edges. Sponging gives a warmer depth to your projects, making them look more professional. To make the edges of my "book" paper look tea-stained, I used Creamy Caramel.
Always use a scrap paper underneath when you sponge. Start off the paper, and work in a circular motion onto the Designer Paper. This will keep the ink light
Also sponge the edges of the inside Very Vanilla piece
Adhere the black pieces to the paper. The smaller one to the sponged note card, and the larger one to the back of the designer paper.
Adhere all your punched pieces together, and use your piercing tool and mat to make a hole in the center of the scallops for a Hodgepodge Hardware brad.
Use Stampin' Dimensionals on only half of the scallop circle...you want to be able to open the card!
Position and stick down your punched shaped. The "For You" is adhered with regular adhesive, the scallop circle with dimensionals (this is only because the back of the brad will not allow it to lay flat - if you are not using a brad in your design, you can adhere it normally ie: flat)
All done!! The only difference between the one I made yesterday, and this one, is the color of the brad in the center of the scallop circle. One is silver, one is very vanilla. And of course, the nature of the designer paper I chose makes them a little unique too...different sections of the "book pages". Love it!
Adorable and VERY quick and easy to do! Have fun!! - The inside is perfect for holding money, a gift card, or a picture!

Wednesday, January 19, 2011

How To: Use a Paper Trimmer

Are you confused by certain measurements when you see them? Having a good paper trimmer will help you, I promise. Always make sure you have the paper snug and straight against the top ruler portion to ensure accurate cuts.

Make sure you have a paper trimmer with an arm that swings out. It can cut 12 x 12 sheets of paper. Fiskars is the brand I would recommend, personally.
I'm making these pictures pretty big, so you can see the details I've added
Add caption
Some examples of measurements and where they are found.

Once you get familiar with your paper trimmer, it's very quick and easy to use. Don't let little-known measurements scare you!

Making your trimmer last forever - TIPS!
Buy replacement blades from Stampin' Up, Michaels, etc. When you cut paper and it burrs the edge a little, instead of a perfect crisp cut, it's time for a new blade.

After much use, my lettering/numbering etc on the main base of the board began to fade and wear off. I took a sheet of sticky rub on laminate (I happened to have had this on hand from years ago), and covered this area (the silver part), and them trimmed to precision with a hobby blade. The printing on the trimmer is now protected, and it should last forever!

I have marked popular cuts on my trimmer with a Sharpie. Right on the ruler part. I have a dot right at the 5.5 mark, which is the most common cut you'll make with homemade cards. It's easy for your eye to see that spot and you never accidentally cut it a 1/4" too small or large!

How To: Trifold card - Video

*PLEASE FORGIVE MY CAMERA* I desperately need a new one, it's broken and over exposes everything. I'll get a new one soon. This should give you the idea though!

This card is really easy to make, and can make a big impression!
"and can be done lots of different ways for different occasions"

This card is one of the options for the Stamp A Stack Class I am holding on Friday

1. Cut your Taken with Teal cardstock to 5.5x11
2. Score at 2 and 3 3/4 from each end. Use a bone folder to go across your score line and make them "tight".
3. Cut designer paper or card stock to 1 3/4 x 5 1/4 (for the front panels). Mine are Very Vanilla card stock, embossed with a Big Shot Impressions Die, to give it some pretty texture. Sponge the edges of the Very Vanilla with Taken with Teal ink. Center and attach to card, using adhesive. A pretty patterned paper would look so nice too!

4. The center image: This can really be any size that would look proportionate to the size of the card. Depending on the stamped image you choose, your dimensions could be larger. I used the stamp set Happy Moments, with the Stamp-a-ma-jig. Very Vanilla piece is cut to 1 7/8 x 2 6/8. Sponge the edges of the vanilla paper.
5. Attach stamped image to Teal background piece, slightly larger than the vanilla one. Dimensions are 3 x 2 1/8. Pierce paper and apply embellishment brad.
6. Adhere the image to only HALF of the center portion of the card, so it will still open.
7. Color the image with ink and blender pens.
NOTE: If you use a dark paper that would not be visible for writing, adhere a piece of coordinating light colored cardstock to the middle back portion of the card. Dimensions would be 3 1/4 x 5 1/4. Sponge the edges with the matching ink.